Read information
3 minute read
Intro
In this part we’ll read parameters from our heater through the interface of Home Assistant and plot them in the UI.
Concept
We’ll be (mis)using the mqtt protocol to send messages from the ebusd program to Home Assistant. This sending of messages will be done in a python script.
Again: in this way we can focus on making all the ebus related items running in python and we don’t have to deal with a custom Home Assistant syntax. I personally prefer spending time learning python over learning a custom program specific language/syntax.
Python script
script below:
- queries the ebus for certain parameters (three temperatures in this example)
- broadcasts them as an mqtt message, pay attention the messages generated in the python scripts (e.g.
sensor/thermostat/temperature) match with thestate_topicdefined in the sensors (see next section) - store the script again in
/home/homeassistant/.homeassistant/python_scripts/
import subprocess
#import time

#read temperature measured by thermostat
cp = subprocess.run(["ebusctl read RoomTemp"],shell=True,stdout=subprocess.PIPE)
cp_string=cp.stdout.decode('utf-8')
busread=cp_string[0:5]
msg1="mosquitto_pub -h localhost -t sensor/thermostat/temperature -u stijn -P mqtt -m "
cp = subprocess.run([msg1+busread],shell=True,stdout=subprocess.PIPE)

# read temperature setpoint
cp = subprocess.run(["ebusctl read DisplayedHc1RoomTempDesired"],shell=True,stdout=subprocess.PIPE)
cp_string=cp.stdout.decode('utf-8')
#print(cp_string)
busread=cp_string[0:4]
#print(busread)
msg1="mosquitto_pub -h localhost -t sensor/thermostat/temperature_set -u stijn -P mqtt -m "
cp = subprocess.run([msg1+busread],shell=True,stdout=subprocess.PIPE)

# read temperature flow heating
cp = subprocess.run(["ebusctl read Hc1ActualFlowTempDesired"],shell=True,stdout=subprocess.PIPE)
cp_string=cp.stdout.decode('utf-8')
#print(cp_string)
busread=cp_string[0:4]
#print(busread)
msg1="mosquitto_pub -h localhost -t sensor/thermostat/temperature_flowtemp -u stijn -P mqtt -m "
cp = subprocess.run([msg1+busread],shell=True,stdout=subprocess.PIPE)


# read time
#cp = subprocess.run(["ebusctl read Time"],shell=True,stdout=subprocess.PIPE)
#cp_string=cp.stdout.decode('utf-8')
#time_read=cp_string[0:8]
#msg1="mosquitto_pub -h localhost -t sensor/thermostat/fubar -u stijn -P mqtt -m "
#print(time_read)
#cp = subprocess.run([msg1+time_read],shell=True,stdout=subprocess.PIPE)
Home assistant
Add the following mqtt sensors to configuration.yaml. This contains a username and password for the mqtt configuration (stored in secrets.yaml), for initial debugging you could consider removing username and password.
mqtt:
  broker: 127.0.0.1
  username: stijn
  password: !secret pass_mqtt
  discovery: true

sensor:
  - platform: mqtt
    name: "Temperature living"
    state_topic: sensor/thermostat/temperature
    unit_of_measurement: "°C"
  - platform: mqtt
    name: "Temperature setpoint living"
    state_topic: sensor/thermostat/temperature_set
    unit_of_measurement: "°C"
  - platform: mqtt
    name: "Temperature flow radiator"
    state_topic: sensor/thermostat/temperature_flowtemp
    unit_of_measurement: "°C"
We’ll create a shell_command to be able to call the python script above to read out the parameters on the ebus, we’ll add a third item called read_ebus (readtime_thermostat.py is the script mentioned above).
In configuration.yaml it looks like this:
shell_command:
  set_temp_high: python3 /home/homeassistant/.homeassistant/python_scripts/set_temperature_on.py
  set_temp_low: python3 /home/homeassistant/.homeassistant/python_scripts/set_temperature_off.py
  read_ebus: python3 /home/homeassistant/.homeassistant/python_scripts/readtime_thermostat.py
Now we will use a first automation to trigger a periodic reading of the ebus (if you don’t want to do this in Home Assistant you could do this in python as well). Here we’ll trigger a new reading every 7 minutes.
add to configuration.yaml:
automation ebusreading:
  alias: read ebus
  trigger:
    platform: time_pattern
    minutes: '/7'
  action:
    service: shell_command.read_ebus
    data:
      message: "thermostat reading"
Home assistant UI
You can see the three sensor values defined and reading out its value :).
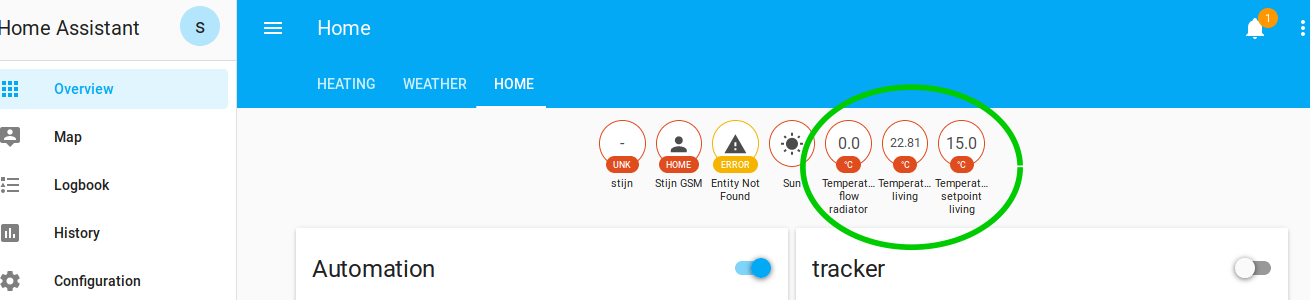
Sensors from the thermostat and heater read through the ebus
To put it in some nice graphs so we can see data over a longer period we need to add this to configuration.yaml:
history_graph:
  gr1:
    name: temperature living
    entities:
      - sensor.temperature_setpoint_living
      - sensor.temperature_living
    hours_to_show: 72
    refresh: 600
  gr2:
    name: temperature heater
    entities:
      - sensor.temperature_flow_radiator
    hours_to_show: 72
    refresh: 600
This results in something like this (pending how you arrange it):
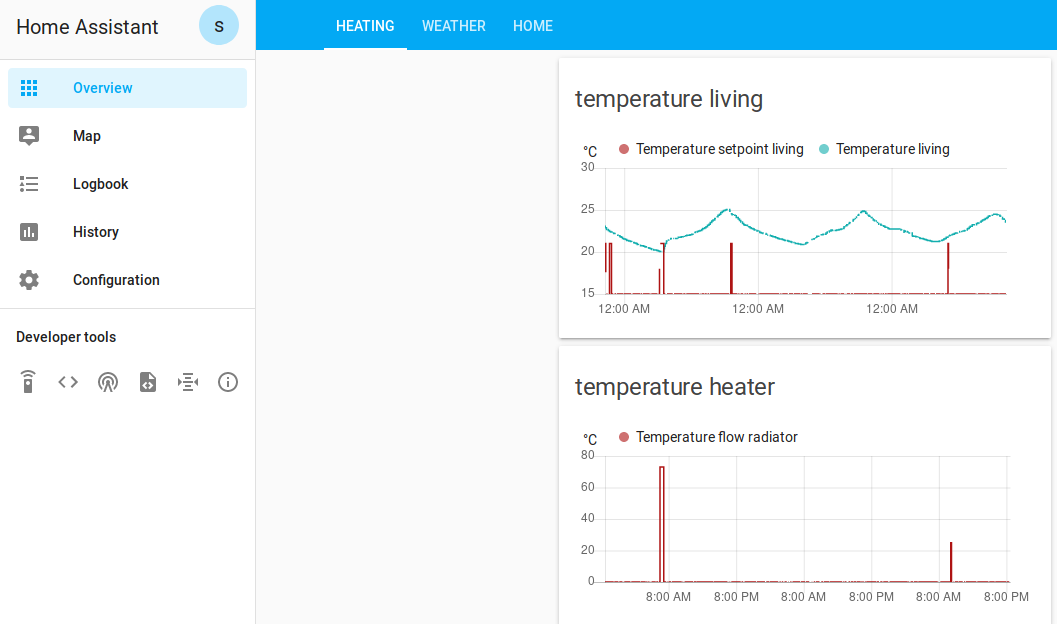
Sensor values in a graph
Tip
I prefer to edit the user interface by code as well (easier to backup/restore), this can be done by adding the following in configuration.yaml
lovelace:
  mode: yaml
and to create a file with the name ui-lovelace.yaml where you for example can add the following:
title: My Awesome Home
views:
  - title: Verwarming
    cards:
      - type: glance
        title: temperaturen
        entities:
          - sensor.temperature_living
          - sensor.temperature_setpoint_living
      - type: history-graph
        title: 'living temperature'
        entities:
          - sensor.temperature_setpoint_living
          - sensor.temperature_living
        hours_to_show: 72
        refresh_interval: 600
      - type: history-graph
        title: 'heater setpunt'
        entities:
          - sensor.temperature_flow_radiator
        hours_to_show: 72
        refresh_interval: 600
Which results in:
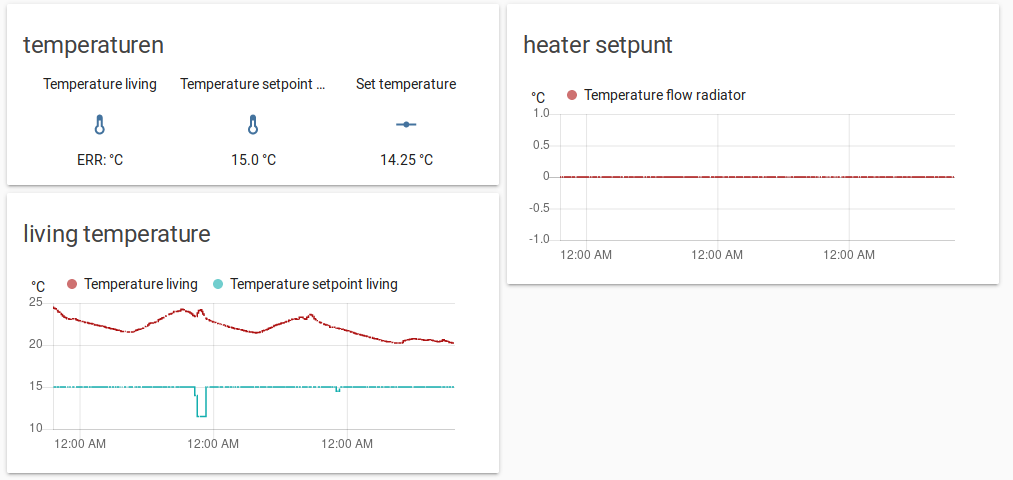
Interface define in ui-lovelace.yaml