Link with home Assistant
3 minute read
Intro
This is the part to generate the content out of home assistant and display it on our e-paper. As an example I will display the expected commute time to work.
Python scripts being defined as a shell_command in configuration.yaml will be used. A simple automation to trigger the python script will be used.
Basis of script
We want to make a plot that tells us the expected time of our commute with a graph of the last hour, to see how the time is trending.
The component waze travel time, will be used to estimate our commuting time (with the name sensor.commute). Setting this up is not described in further detail.
sensor:
- platform: waze_travel_time
  name: "commute"
  origin: zone.home
  destination: zone.work
You should create a www directory in your configuration folder
Note: To get the data out of home assistant, I’ve explored a few routes. Using hass-python script for interfacing with home assistant, scripts that would operate on home-assistant_v2.db, … until I’ve stumbled upon the Home Assistant: REST API. After this discovery, I don’t know why I should use anything else to capture data. Since this can be accessed from anywhere on the network (and makes debugging easy).
REST API
The documentation from the REST API, describes how to obtain a long term token. This needs to be filled in the hearders file (the xxx location).
#location where figure will be stored
path="/home/homeassistant/.homeassistant/www"
os.chdir(path)

# e-paper display size
width_displ=640
height_displ=384
dpi=100;

headers = {
    'Authorization': 'Bearer xxx,
    'content-type': 'application/json',
}
address_hass='192.168.0.205'
Getting timezones
All data gets stored with UTC timestamps. We want to convert our data to the local timezone.
Obtaining the timezone can be done by requesting the /api/config:
# get timezone to convert to local time, since database attributes are in UTC time
url='http://'+address_hass+':8123/api/config'
response = get(url, headers=headers)
temp=response.text
readable_json=json.loads(temp)
time_zone=readable_json['time_zone']
tz = timezone(time_zone)
Get sensor history
Here the data from our sensor will be obtained, by default the history of 1 day is provided. The data will be stored in numpy arrays and will be immediately converted to the local timezone.
entity_id='sensor.commute'

# this downloads history of the last day
url='http://'+address_hass+':8123/api/history/period'+'?filter_entity_id='+entity_id

response = get(url, headers=headers)
temp=response.text
temp=temp[1:len(temp)-1]
readable_json=json.loads(temp)

time_array= np.array([])
state_array=np.array([])
for i in readable_json:
    time_update=datetime.strptime(i['last_updated'],'%Y-%m-%dT%H:%M:%S.%f%z')
    time_array=np.append(time_array, time_update.astimezone(tz))
    state_array=np.append(state_array,float(i['state']))
Create bitmap file
At last, a plot from the data within the last hour will be created, the x-axis will be plotted containing hours and minutes
# only plot data from last hour
time_treshold=time_array[-1]-timedelta(hours=1)
idx=time_array>time_treshold

last_info=readable_json[-1]
last_attr=last_info['attributes']

fig=plt.figure(num=None, figsize=(int(width_displ/dpi), int(height_displ/dpi)), dpi=dpi, facecolor='w', edgecolor='k')

plt.plot(time_array[idx],state_array[idx],linewidth=7.0,c='k')
plt.ylabel('Minutes',fontsize=20)
plt.xticks(fontsize=18)
plt.yticks(fontsize=18)
ax = plt.gca()
ax.yaxis.set_major_formatter(FormatStrFormatter('%.0f'))

plt.title('Commute: '+format(state_array[-1],'.0f')+' min'+'\n '+'Route: '+last_attr['route'],fontsize=28)

xformatter = DateFormatter('%H:%M')
plt.gcf().axes[0].xaxis.set_major_formatter(xformatter)
plt.gcf().autofmt_xdate()

fig.savefig('plot.png',bbox_inches='tight',dpi=dpi)
Example, generated figure:
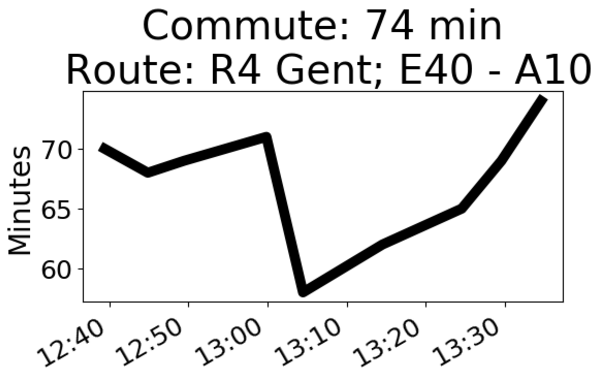
Example bitmap
Testing the python script
ssh to the home assistant server (raspberry pi)
sudo su -s /bin/bash homeassistant
cd /home/homeassistant/.homeassistant/python_scripts/
python3 db_plotter.py
As a next step we will add options to the python script, so we can command different options through automations in home assistant.
# check if passed options are valid
try:
    options, args = getopt.getopt(sys.argv[1:], 's:',['selection='])
    # print(options)
    # print(args)
except getopt.GetoptError:
    print("incorrect syntax")
    print("usage: python3 db_plotter.py -s <value>")
    print("default to option 1")
    display_option=1
    sys.exit(2)
for opt, value in options:
    if opt in ('-s','-S','--selection'):
        display_option=int(value)
        print("successful argument")
        print(display_option)
The whole script, created above will be moved to an if-else construction
if display_option==2:
    entity_id='sensor.commute'
    ....
Now we need to test the script by running: python3 db_plotter.py -s 2.0
Configuration.yaml
Define the script as a shell command with the option to give different arguments with it, contained in a dummy variable (dummy_epaper).
shell_command:
  take_screenshot: 'python3 /home/homeassistant/.homeassistant/python_scripts/db_plotter.py -s {{ states.input_number.dummy_epaper.state }}'

input_number:
  dummy_epaper:
    name: dummy epaper
    initial: 2
    min: 1
    max: 3
    step: 1