I think we all want a more intelligent control over our heaters than what the standard thermostats have to offer. e.g. Automatically turning the heating off when leaving your home, scheduling the heater to turn on sooner in the morning when it’s cold, remotely turning on/off the heating when coming home, … .
Disregarding privacy concerns and long-term servicing for a minute, commercial solutions like Google Nest only seem to support on/off control of the heating. If we want to use proportional/modulated heating for more comfort, at the time of writing, the amount of solutions seems very limited.
Luckily, the open-source world has done a massive amount of work related to home automation and understanding the protocols used by commercial heating systems. Despite all this work, it is a learning curve to find your way through all the different tools / programs and how to use them. When my system ever breaks down I want to have some documentation how I did everything again. So I’ve made some documentation and made it public … .
1 - intro
Goal
If your goal is to remove your thermostat completely, that’s not going to happen in this blog.
The posts provide guidance how to add additional intelligence and monitoring to our setup and serve as documentation for myself and others. It’s not a dummy proof step-by-step guide.
Tools
We’ll be using the following hardware and software:
A debian based system ( (old) laptop, tinkerboard, Raspberry pi 3b, …)
Ebus is the communication protocol used by a lot of heating systems, we’ll have to tap into this communication system to help our thermostat become more intelligent.
It’s fair to say without the ebusd software this project would never have happened.
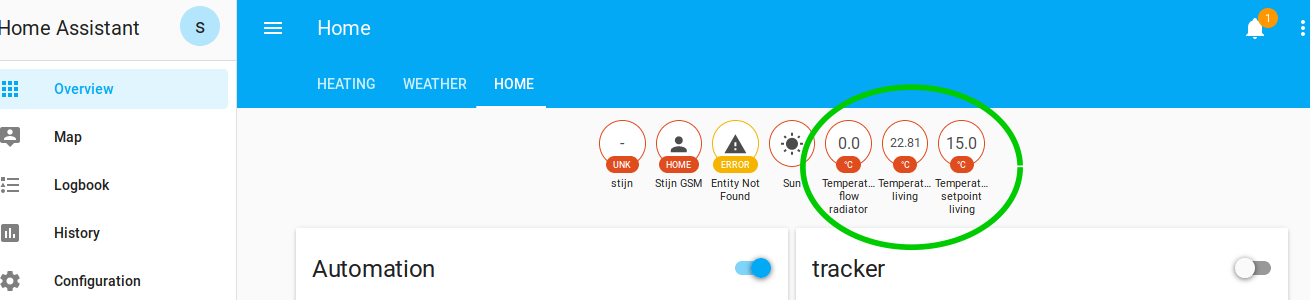
set our requested room temperature through the interface of Home Assistant.
Preparing the host
There is hassbian, hass.io, homme-assistant itself, … as you see, not confusing at all :). I’m using a regular debian based system since at least I know ebusd works in a debian environment. I’m not familiar with docker (hass.io) and its limitations.
A detailed description to setup your host can be found here.
Initial temperature test using Home Assistant
It’s time to get our heater commanded through Home Assistant.
In general it’s good to:
read a few intro’s on Home Assistant before you jump in to it
get Samba up and running so you can edit your home assistant files from your standard working computer (again enough other tutorials can be found)
Concept
We’ll be using python scripts to trigger actions from Home Assistant to ebus(d).
In this way we can focus on making all the ebus related items running in python and we don’t have to deal with the custom Home Assistant syntax. I personally prefer spending time learning python over learning a custom program specific language/syntax.
python scripts
We’ll create a few python scripts to test if we can control our heater from python. On the Pi we will create a new folder python_scripts locate the scripts in /home/homeassistant/.homeassistant/python_scripts.
The script below with the name set_temperature_on.py will set the day and night temperatures to 21C by calling the appropriate ebus commands directly from the command line (making use of the subprocess function). The second part of the script just does an additional check if it was really set correctly.
create the same script with the name set_temperature_off.py where msg2 in the script below has been changed to msg2=15. (Yes, I know this is a stupid way of working and we should give the temperature as an argument to the python script. But for initial testing/debugging this is good enough.)
import subprocess
import time

msg2="21" #setpoint temperature degrees celsius

msg1="ebusctl write -c f37 Hc1DayTemp "
cp = subprocess.run([msg1+msg2],shell=True,stdout=subprocess.PIPE)

msg1="ebusctl write -c f37 Hc1NightTemp "
cp = subprocess.run([msg1+msg2],shell=True,stdout=subprocess.PIPE)

#redundancy check if it is truly set
time.sleep(60)

cp = subprocess.run(["ebusctl read Hc1DayTemp"],shell=True,stdout=subprocess.PIPE)
temp=cp.stdout
if int(float(temp[0:4]))!=int(msg2):
    # if not set correct
    msg1="ebusctl write -c f37 Hc1DayTemp "
    cp = subprocess.run([msg1+msg2],shell=True,stdout=subprocess.PIPE)


cp = subprocess.run(["ebusctl read Hc1NightTemp"],shell=True,stdout=subprocess.PIPE)
temp=cp.stdout
if int(float(temp[0:4]))!=int(msg2):
    # if not set correct
    msg1="ebusctl write -c f37 Hc1NightTemp "
    cp = subprocess.run([msg1+msg2],shell=True,stdout=subprocess.PIPE)
else:
    print("setting correct")
check if the scripts are really working by running the command from the raspberry pi terminal python3 -i set_temperature_on.py
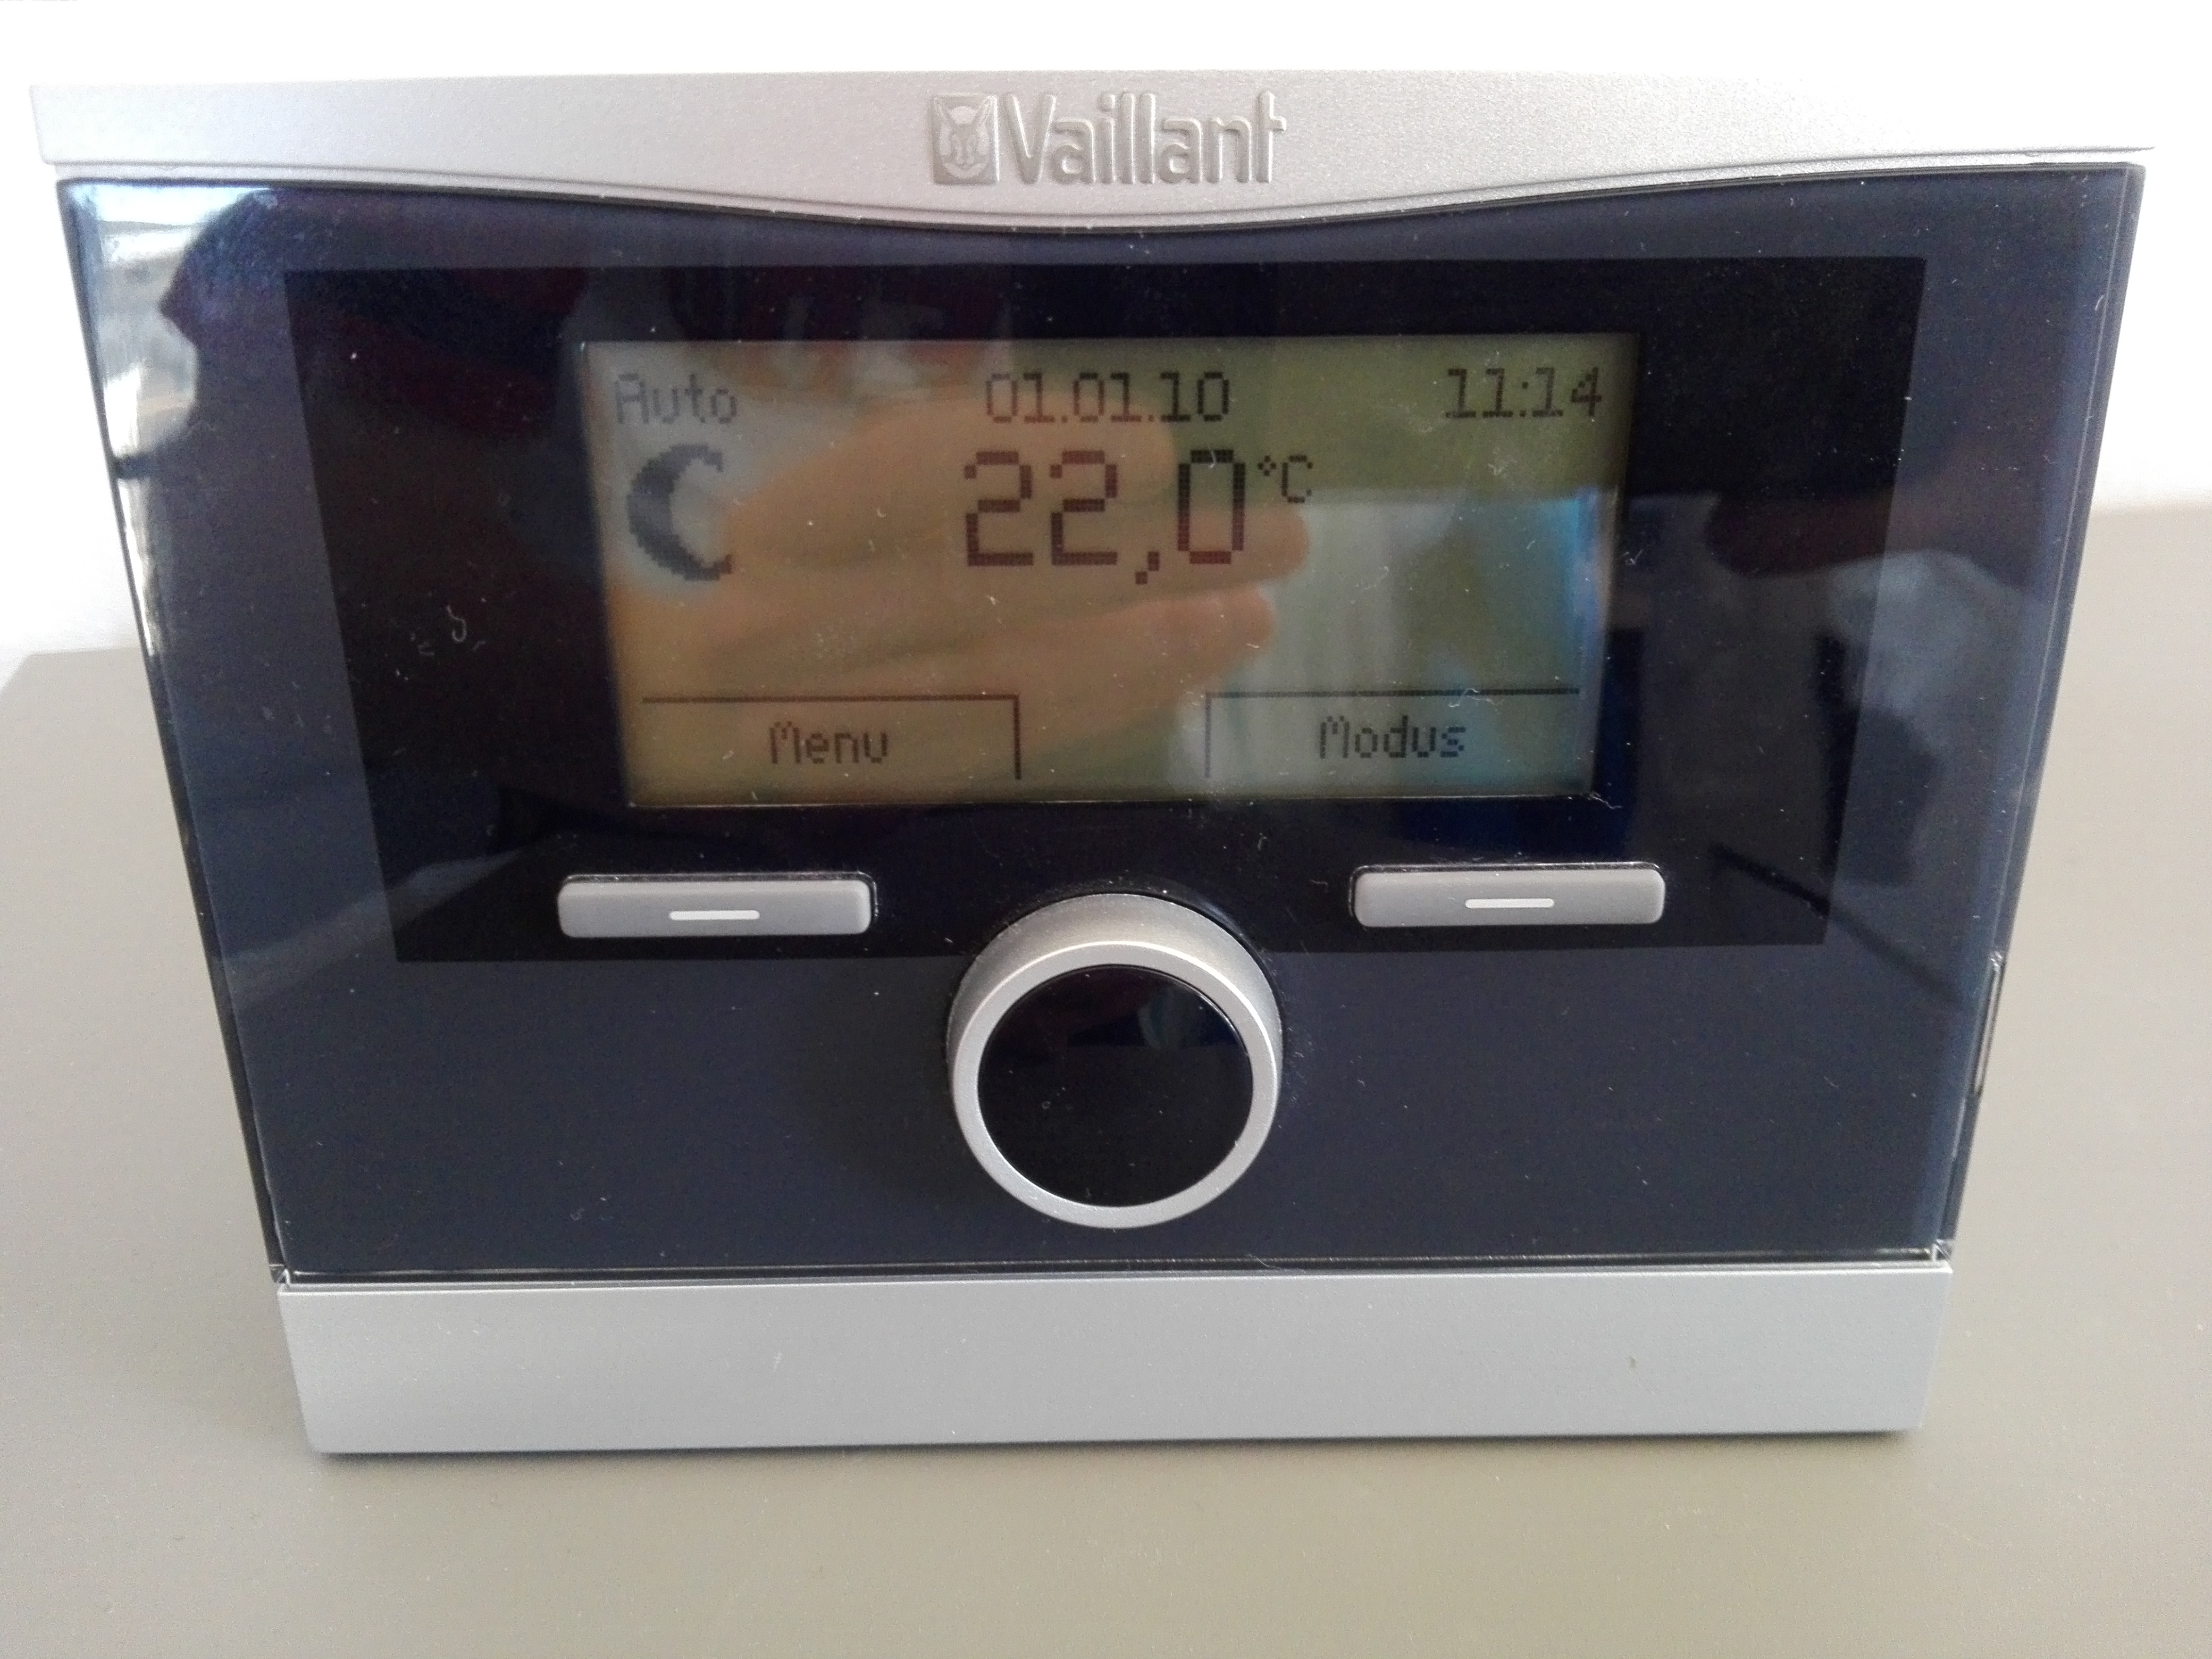
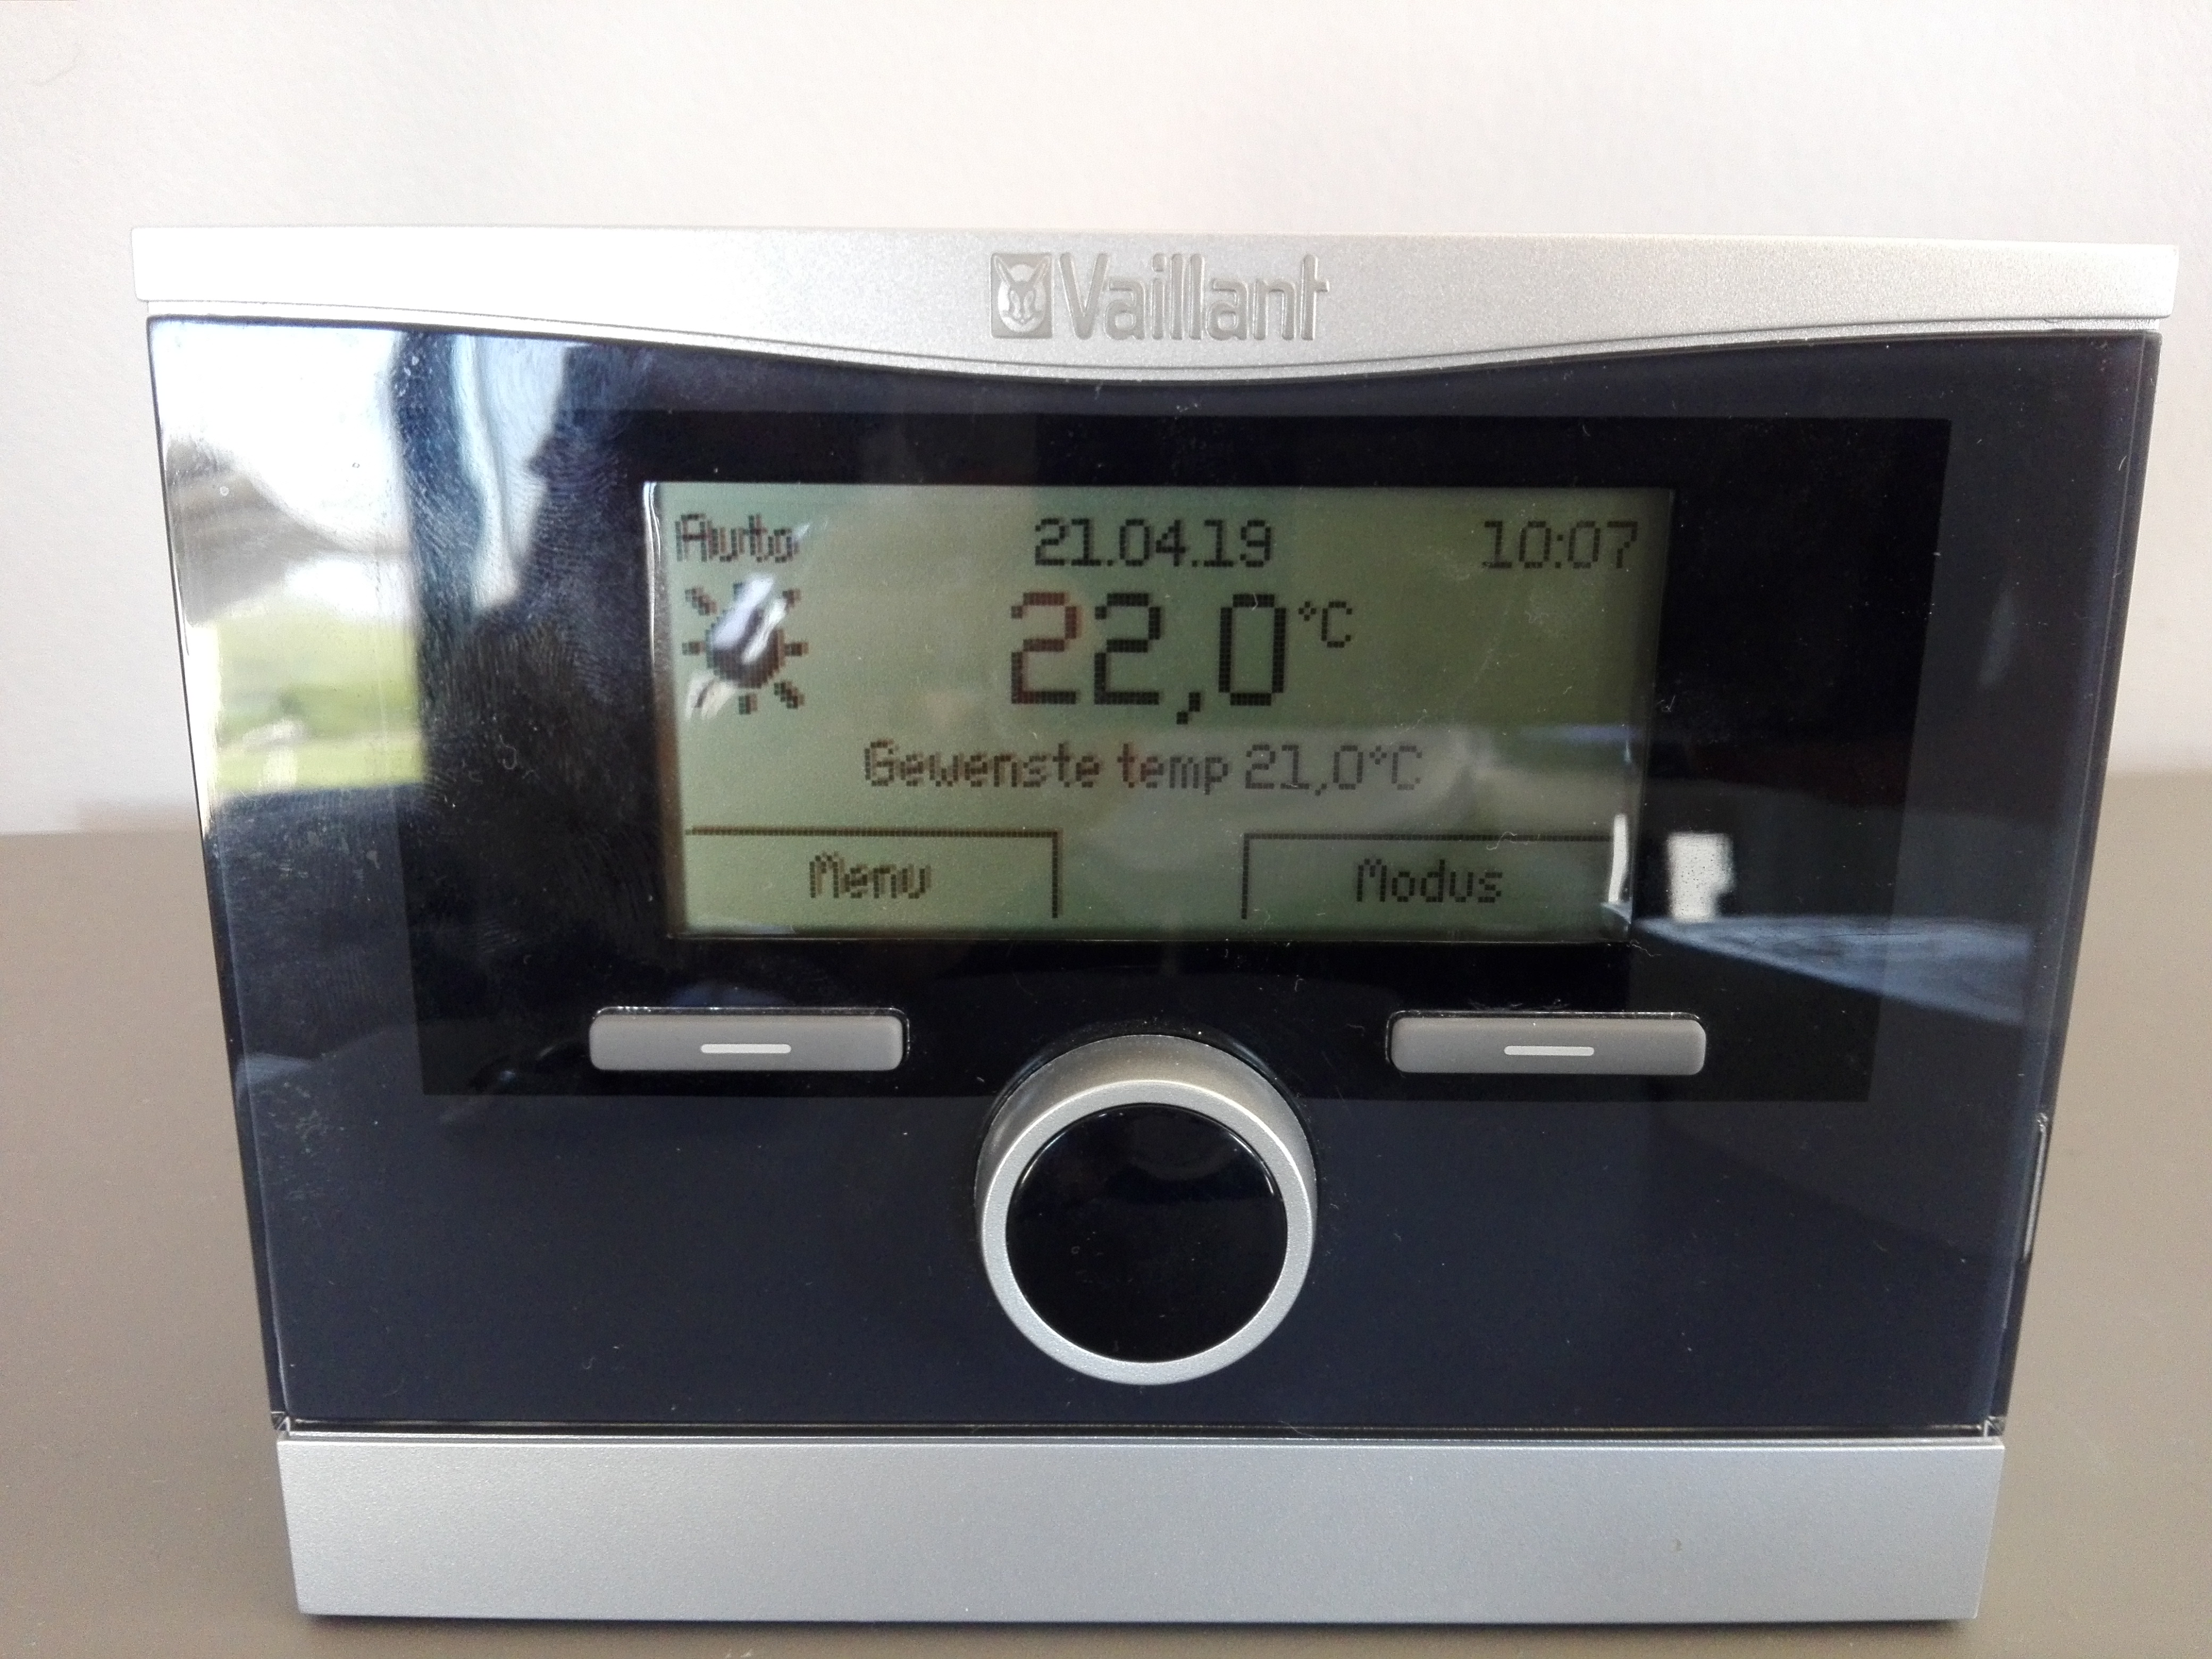
as an additional check, on the thermostat you will see the temperature setting change
Python script has set temperature to 21 degrees!
do the same for the script python3 -i set_temperature_off.py
Now this is working, we’ll link it to Home Assistant.
If you’ve followed Home Assistant intro’s, you know all magic happens in the configuration.yaml file(s).
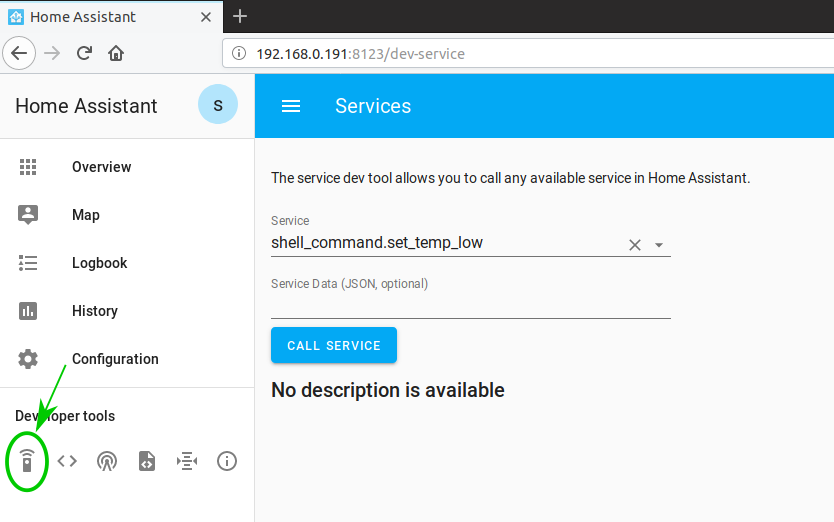
We’ll be using the shell_command component which basically just executes a script in the terminal / command line of the raspberry.
Add the following into configuration.yaml and reload/reboot home assistant.
if you select the set_temp_low and set_temp_high and press “call service” the temperature will be set to 15 and 21 degrees :)
Service becomes available in Home Assistant
Clean up method
In the sections above, we’ve demonstrated the basic functionallity of controlling the temperature requests. Next steps are:
to provide the temperature as an argument from Home Assistant to the python script (instead of the hardcoded values from above)
get rid of seperate python scripts for each function (harder to maintain)
make sure not multiple people write at the same moment to the ebus (don’t want to confuse our system)
Adapt python scripts
Starting with the python scripts:
We want to provide the temperature as argument to our python script (have msg2 as an external input in our script)
We’ll use the getopt module in python and parse the arguments to create a temp setpoint,
import getopt

# check if passed options are valid
try:
    options, args = getopt.getopt(sys.argv[1:], 't:',['temperature_setpoint='])
    print(options)
    print(args)
except getopt.GetoptError:
    print("incorrect syntax")
    print("usage: python3 set_temperature.py -t <value>")
    print("default to 12 degrees")
    msg2=12
    sys.exit(2)
for opt, value in options:
    if opt in ('-t','-T','--temperature_setpoint'):
        msg2=value
        print("successful argument")
        print(msg2)
running the script in commandline becomes: python3 /home/homeassistant/.homeassistant/python_scripts/set_temperature.py -t 20.5
User interface
In configuration.yaml, we’ll define three input boxes for setting a temperature (night, day and an additional one for instant change of the heating).
The critical part are the additional {{}} arguments in the shell_command definition. The exact name of the argument you need to find back in the states menu in the user interface.
import subprocess
import time
import getopt
import sys
from ilock import ILock

# check if passed options are valid
try:
    options, args = getopt.getopt(sys.argv[1:], 't:',['temperature_setpoint='])
    print(options)
    print(args)
except getopt.GetoptError:
    print("incorrect syntax")
    print("usage: python3 set_temperature.py -t <value>")
    print("default to 12 degrees")
    msg2=12
    sys.exit(2)
for opt, value in options:
    if opt in ('-t','-T','--temperature_setpoint'):
        msg2=value
        print("successful argument")
        print(msg2)

with ILock('ebus', timeout=200):
	msg1="ebusctl write -c f37 Hc1DayTemp "
	cp = subprocess.run([msg1+msg2],shell=True,stdout=subprocess.PIPE)

	msg1="ebusctl write -c f37 Hc1NightTemp "
	cp = subprocess.run([msg1+msg2],shell=True,stdout=subprocess.PIPE)

	time.sleep(30)

	#check if it is truly set
	cp = subprocess.run(["ebusctl read Hc1DayTemp"],shell=True,stdout=subprocess.PIPE)
	temp=cp.stdout
	if int(float(temp[0:4]))!=int(float(msg2)):
	    # if not set correct
	    msg1="ebusctl write -c f37 Hc1DayTemp "
	    cp = subprocess.run([msg1+msg2],shell=True,stdout=subprocess.PIPE)

	cp = subprocess.run(["ebusctl read Hc1NightTemp"],shell=True,stdout=subprocess.PIPE)
	temp=cp.stdout
	if int(float(temp[0:4]))!=int(float(msg2)):
	    # if not set correct
	    msg1="ebusctl write -c f37 Hc1NightTemp "
	    cp = subprocess.run([msg1+msg2],shell=True,stdout=subprocess.PIPE)
	else:
	    print("setting correct")
3 - Setup hardware and ebus
Intro
In this part we’ll connect to the communication bus of the heater and read / write some parameters by manually commanding them via a debian based system (tinkerboard, raspberry, laptop, …).
Hardware
Ebus adapter
We need an ebus adapter for the raspberry to interface with our heater. I’m not going to write down all the details, since I can just refer to them:
I’m using the base board version 2.2, there might be better options to use directly with a raspberry pi. But when I ordered, it looked like the most flexible solution.
Adapter was ordered on the fhem forum. They will send you a pcb with a set of components, you have to solder yourself (or pay a bit extra): https://forum.fhem.de/index.php/topic,93190.msg857894.html#msg857894. If you’ve read the first link you will also know there are commercial options in case you don’t want this.
Put it in a box so there is no chance on touching electrical connections etc. .
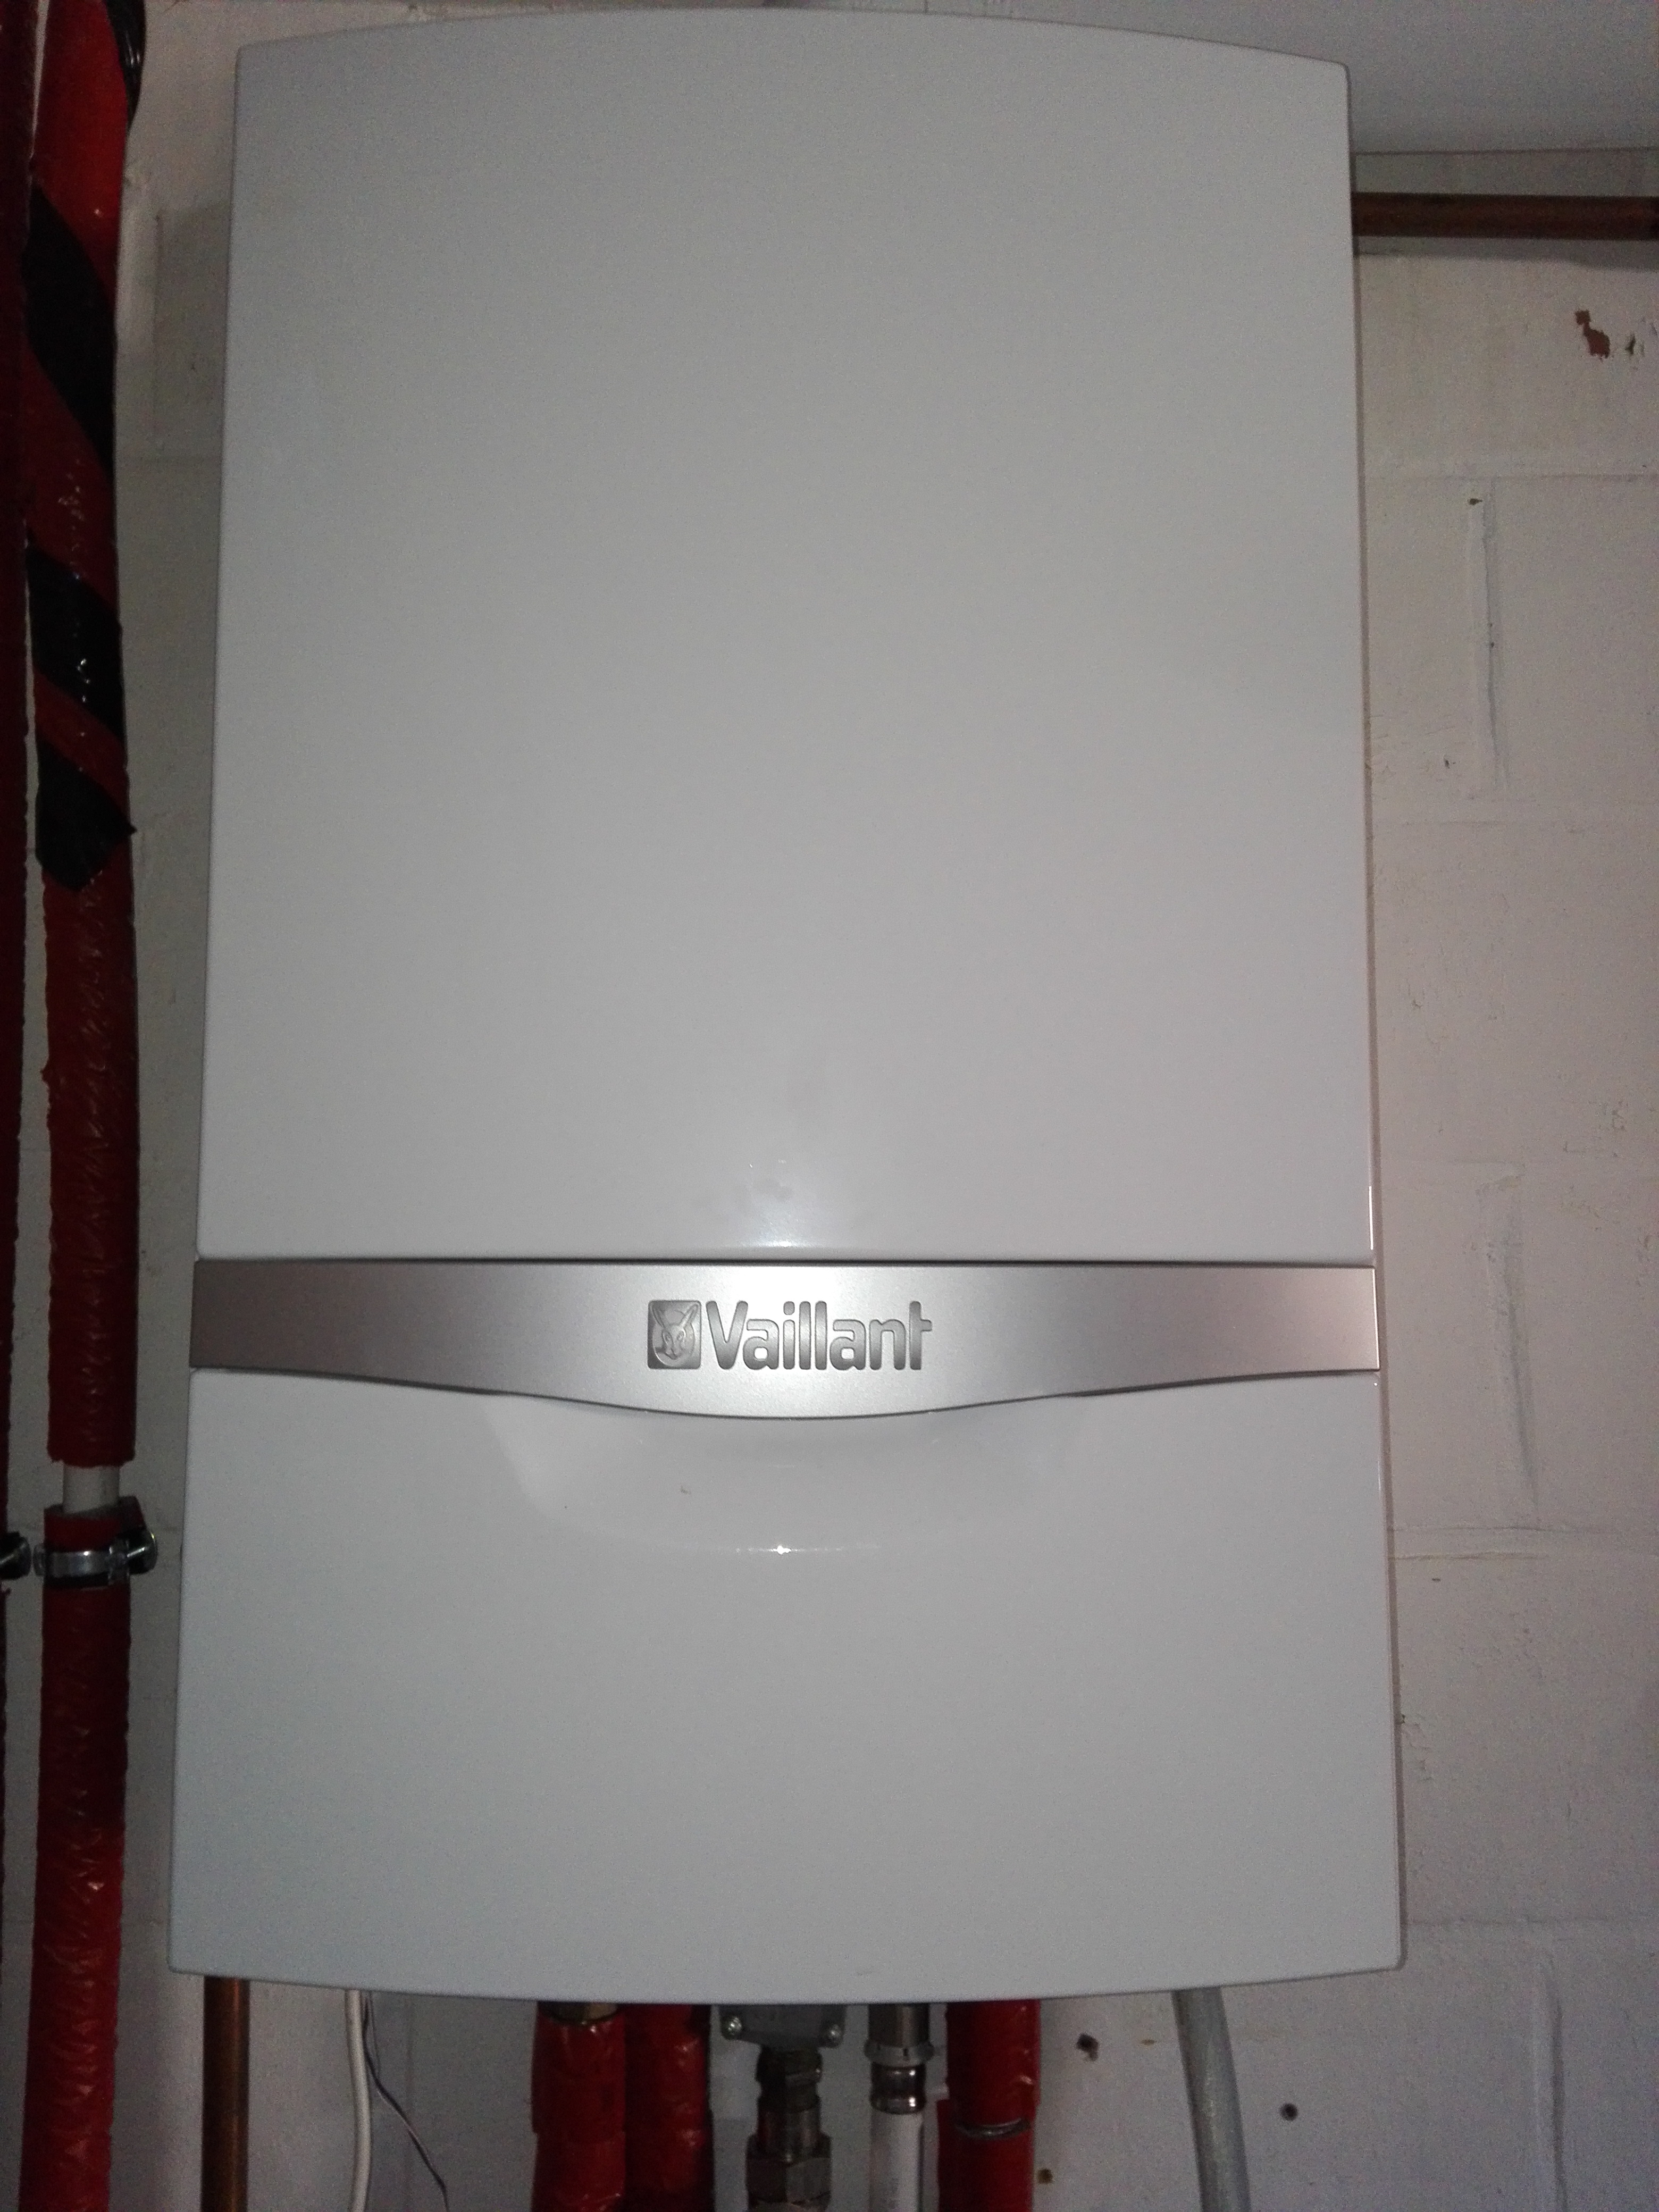
You could consider placing the adapter inside the heater (plenty of space), I just didn’t want to put custom electronics inside … .
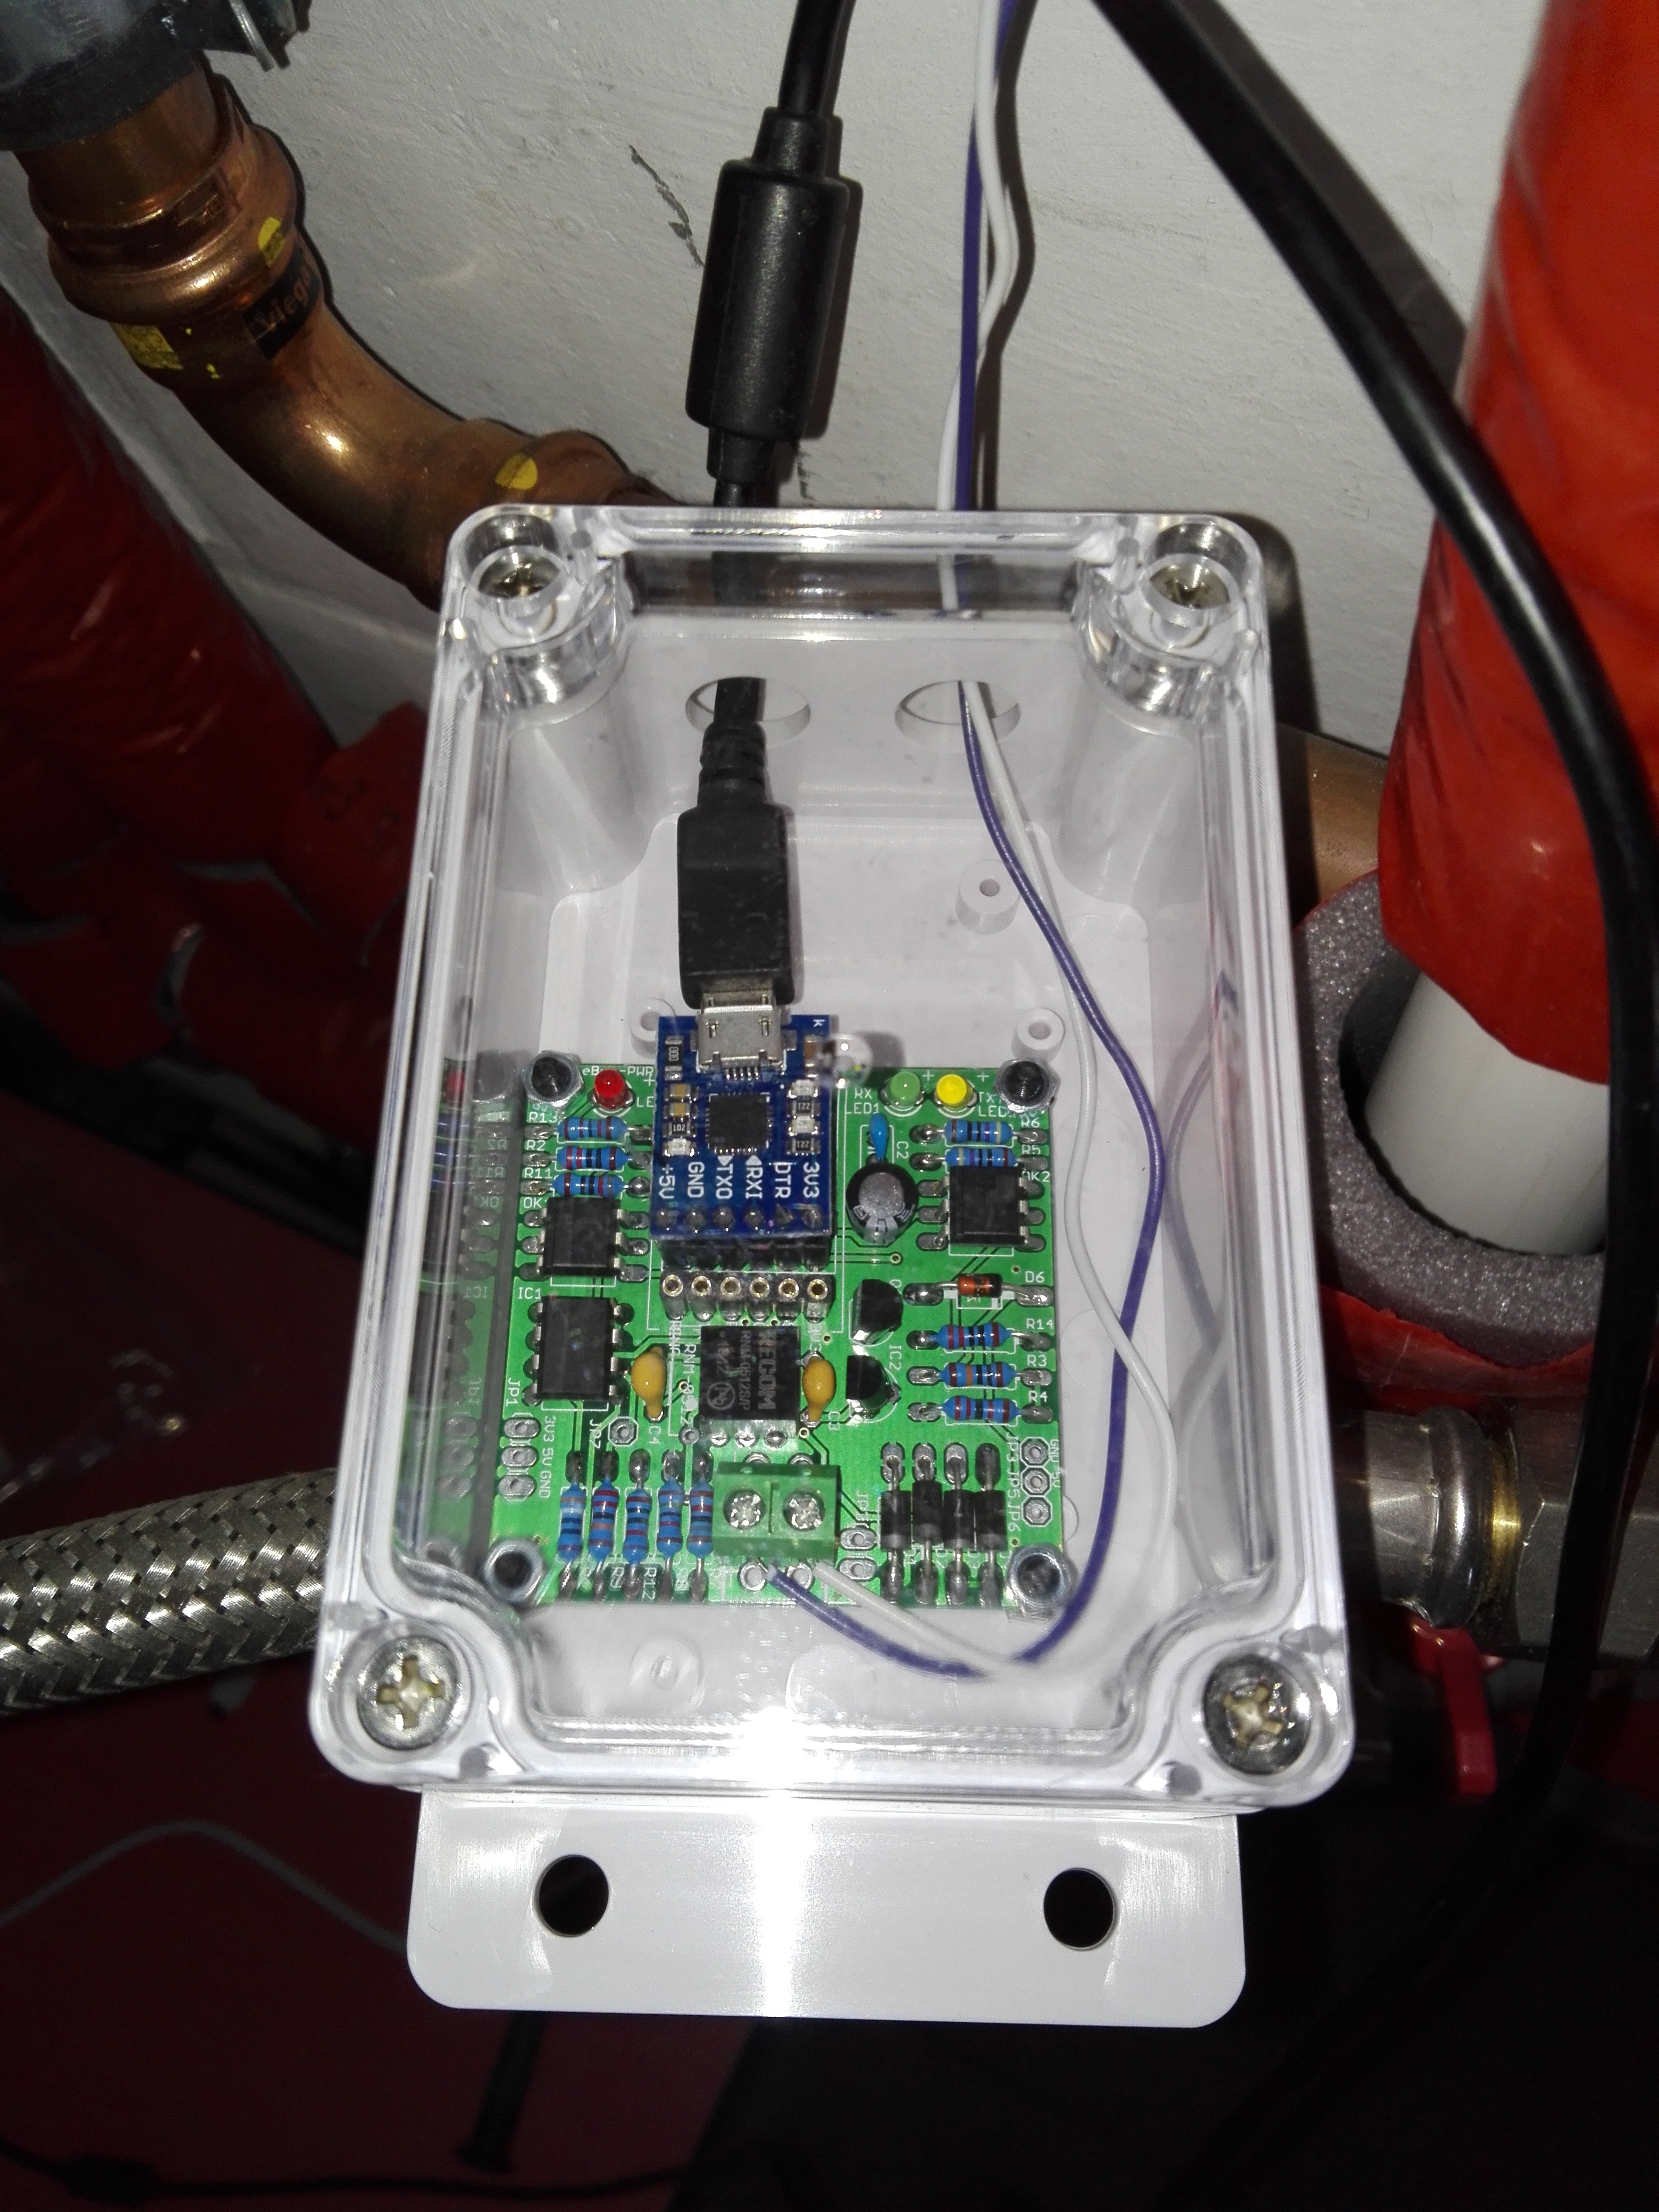
ebus adapter v2.2
Attention!!
Connecting the ebus adapter over USB to your host, is not reliable over longer periods of time! I’ve wasted way too much time with an unreliable home automation because of this. Connecting the adapter to a wemos, seems the more reliable route.
Use a 32Gb size SD card (recommended by Home Assistant).
My setup
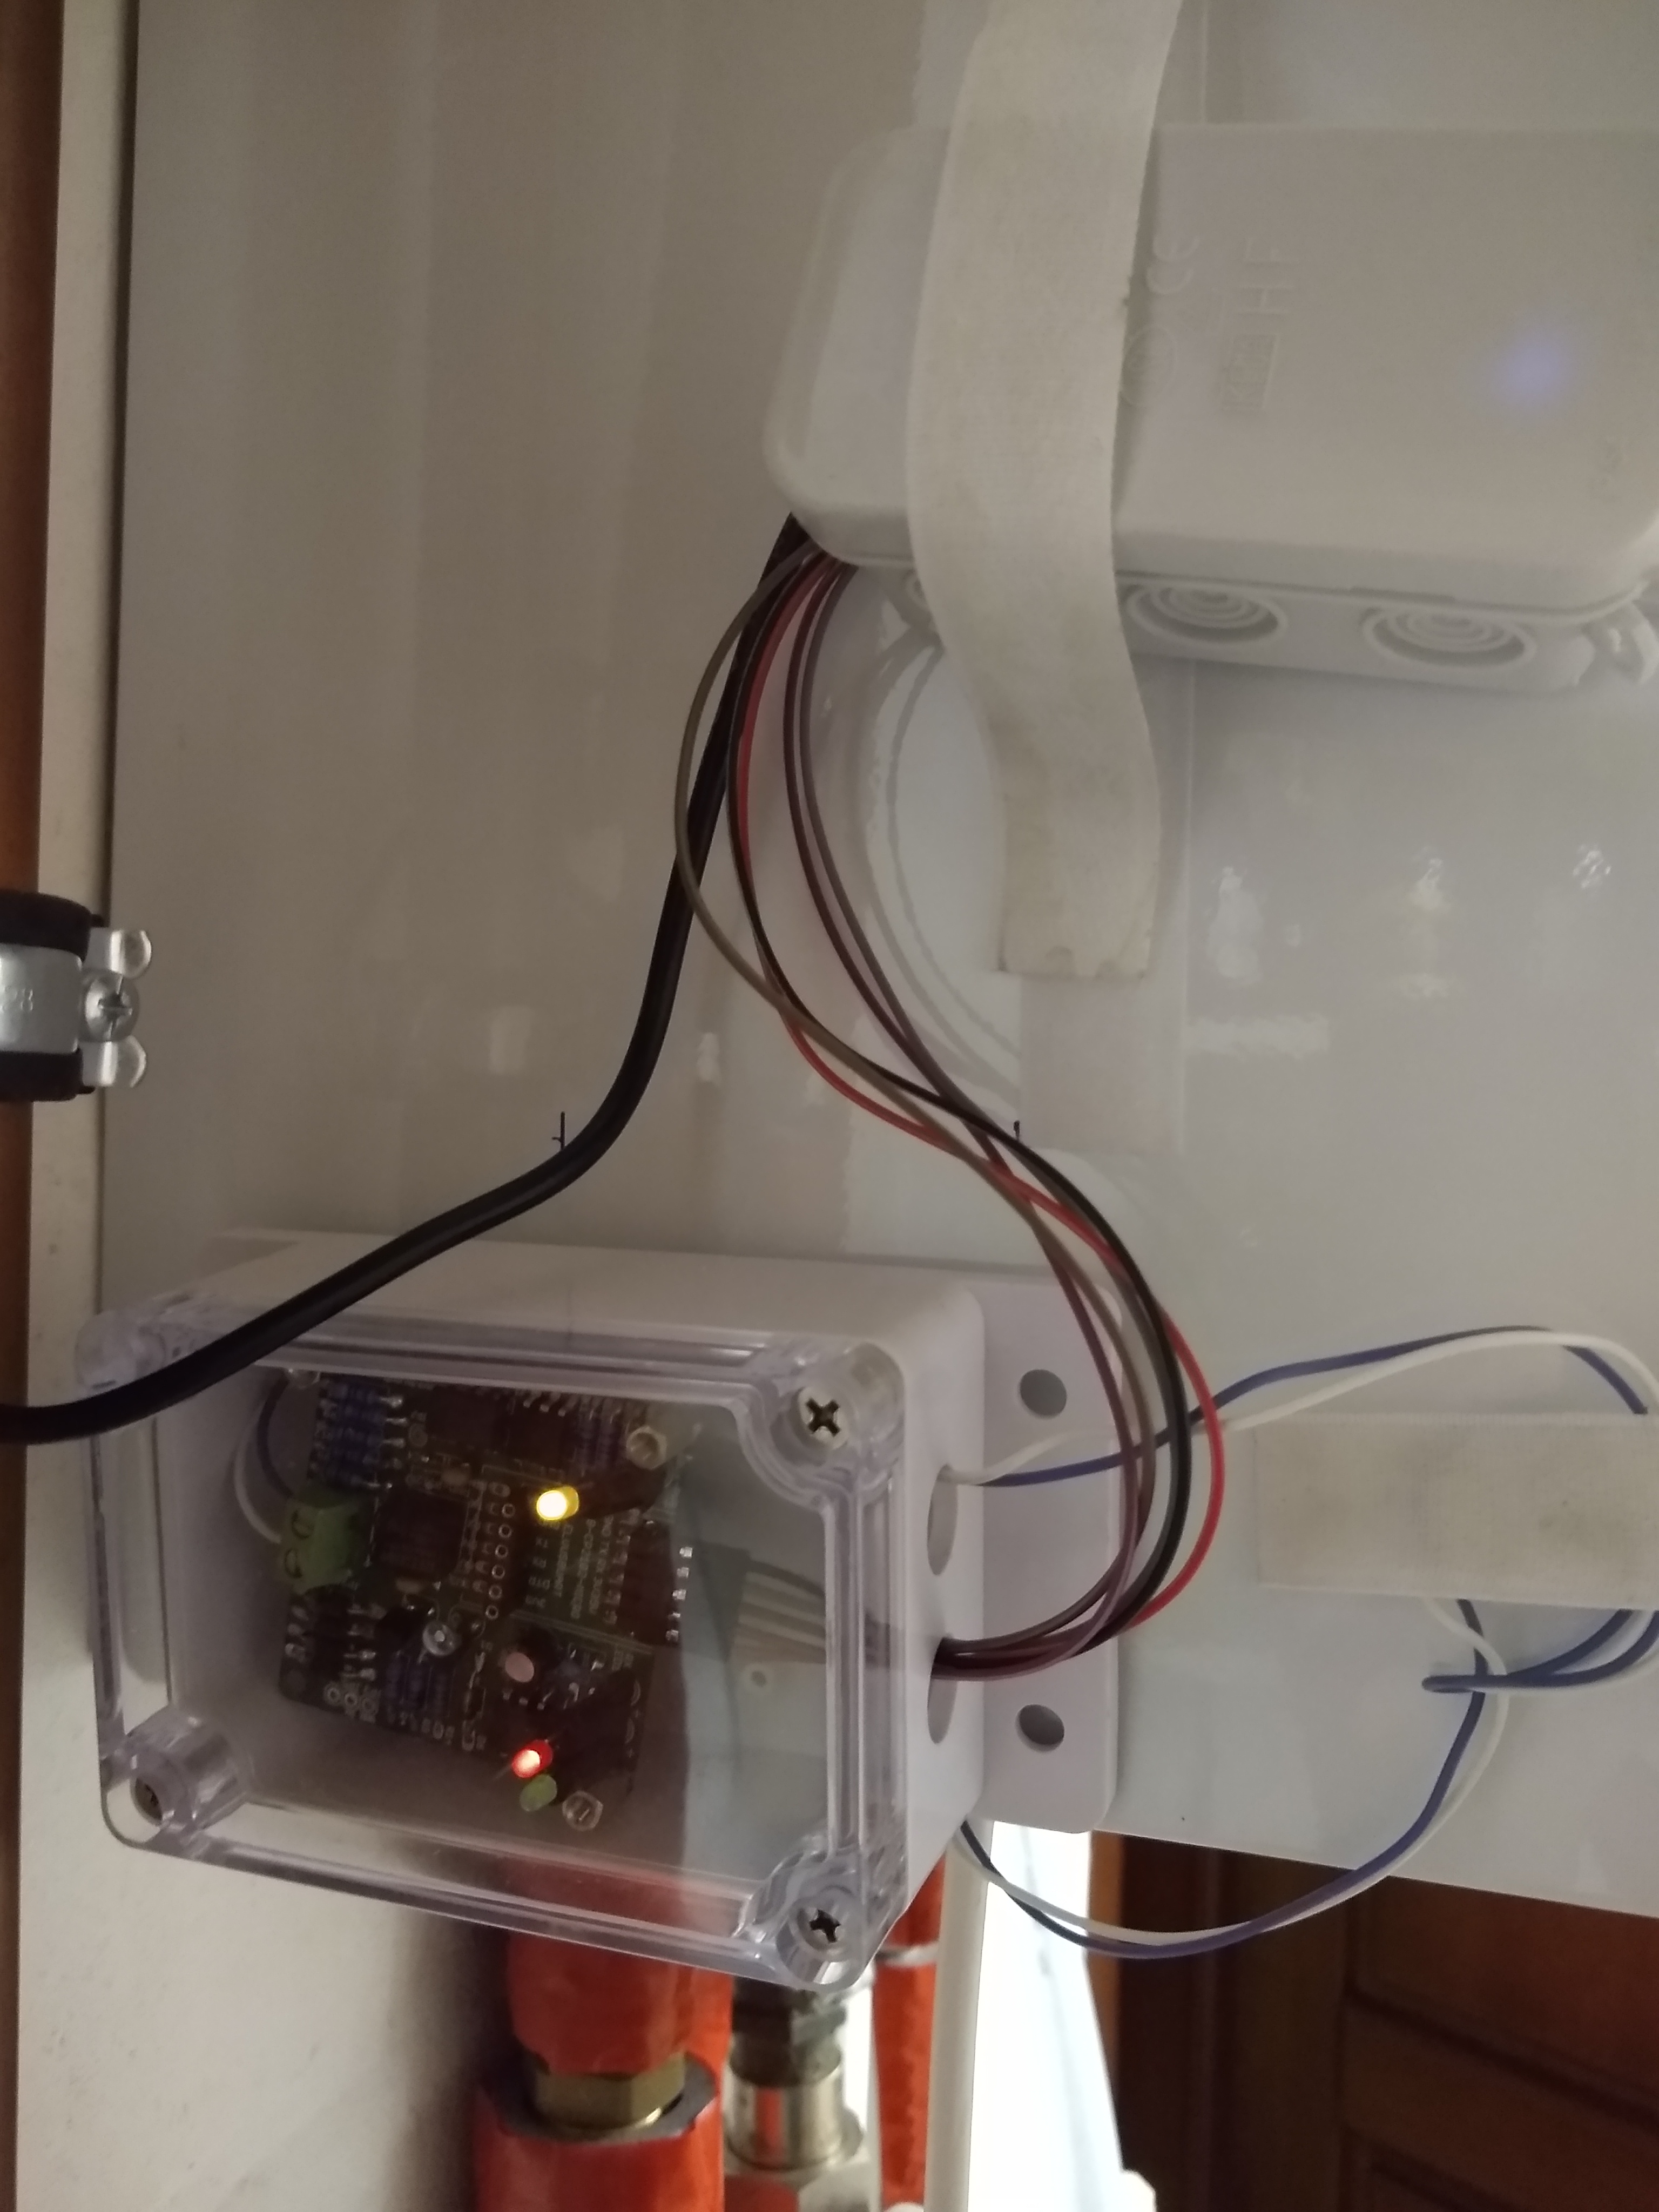
Wemos mini D1 and ebus adapter mounted on heater
Wemos mini D1 and ebus-adapter (without uart interface) are mounted against the heater by using velco strips
The white and purple wire are the ebus, they are connected inside the heater (ebus protocol has no polarity, so you can swap the wires)
ebus-adapter is connected through five wires as described here
Software
Software Wemos D1 mini
A special software is created by john30, the procedure to start using it is described on his github page.
There is not much too add here.
ebusd
First install the ebus related software on your system running your home automation, see the ebus section in the installation guide.
If this is done, adapt your ebus configuration to match your wemos settings:
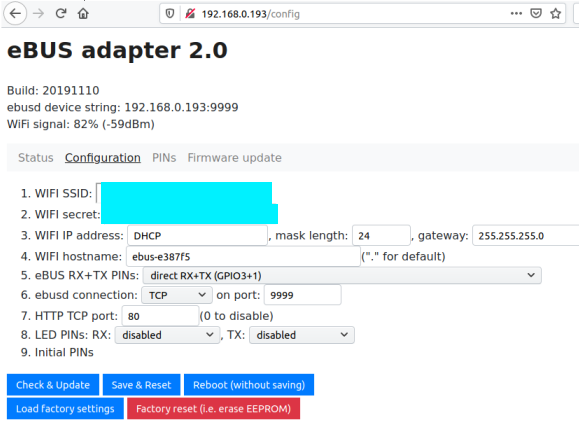
Check the settings in the interface of the wemos / ebus adapter, the ebusd device string is what you’ll need in the next step.
Interface when browsing to wemos D1 mini
adapt the ebus configuration on your host, as described in the following steps:
cd /etc/default
sudo nano ebusd
Adapt the EBUSD_OPTS in the file, so you get something like the example below. (Pending your internet connection / hardware you might have to play with the latency parameters.)
# /etc/default/ebusd:
# config file for ebusd service.

# Options to pass to ebusd (run "ebusd -?" for more info):
#EBUSD_OPTS="--scanconfig"
EBUSD_OPTS="-d 192.168.0.193:9999 -l /var/log/ebusd.log --scanconfig --latency=100000 --address=01"
# MULTIPLE EBUSD INSTANCES WITH SYSV
# In order to run multiple ebusd instances on a SysV enabled system, simply
# define several EBUSD_OPTS with a unique suffix for each. Recommended is to
....
Do a restart of the ebusd and check its status:
sudo systemctl restart ebusd
sudo systemctl status ebusd
The output should look like this:
● ebusd.service - ebusd, the daemon for communication with eBUS heating systems.
   Loaded: loaded (/lib/systemd/system/ebusd.service; enabled; vendor preset: enabled)
   Active: active (running) since Sat 2019-12-21 16:45:54 UTC; 56min ago
  Process: 3221 ExecStart=/usr/bin/ebusd $EBUSD_OPTS (code=exited, status=0/SUCCESS)
 Main PID: 3222 (ebusd)
    Tasks: 4 (limit: 4749)
   Memory: 1.5M
   CGroup: /system.slice/ebusd.service
           └─3222 /usr/bin/ebusd -d 192.168.0.193:9999 -l /var/log/ebusd.log --scanconfig --latency=100000 --address=01

Dec 21 16:45:54 tinkerboard systemd[1]: Starting ebusd, the daemon for communication with eBUS heating systems....
Dec 21 16:45:54 tinkerboard systemd[1]: Started ebusd, the daemon for communication with eBUS heating systems..
check if your heating system is identified by running ebusctl info:
xxx@tinkerboard:~$ ebusctl info
version: ebusd 3.4.v3.3-51-g57eae05
update check: revision v3.4 available
signal: acquired
symbol rate: 42
max symbol rate: 102
min arbitration micros: 20
max arbitration micros: 177
min symbol latency: 6
max symbol latency: 80
reconnects: 0
masters: 3
messages: 345
conditional: 2
poll: 0
update: 9
address 01: master #6, ebusd
address 03: master #11
address 06: slave #6, ebusd
address 08: slave #11, scanned "MF=Vaillant;ID=BAI00;SW=0202;HW=9602", loaded "vaillant/bai.0010015600.inc" ([HW=9602]), "vaillant/08.bai.csv"
address 10: master #2
address 15: slave #2, scanned "MF=Vaillant;ID=F3700;SW=0114;HW=6102", loaded "vaillant/15.f37.csv"
Query some commands to see if everything is working as expected.
Useful commands to debug can be tail -30 /var/log/ebusd.log, this to see what ebus has been written to the log file configured in EBUSD_OPTS.
4 - Read information
Intro
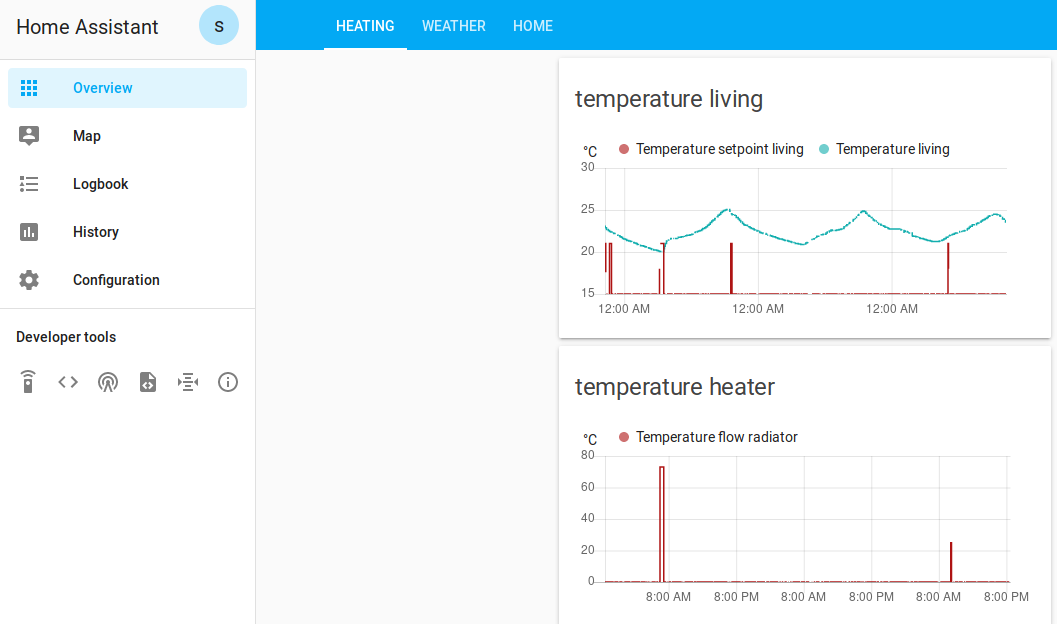
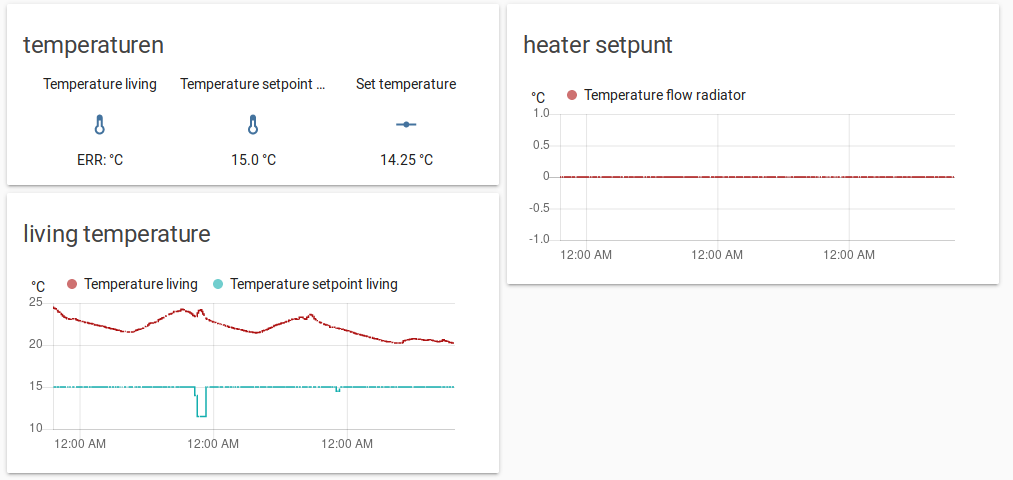
In this part we’ll read parameters from our heater through the interface of Home Assistant and plot them in the UI.
Concept
We’ll be (mis)using the mqtt protocol to send messages from the ebusd program to Home Assistant. This sending of messages will be done in a python script.
Again: in this way we can focus on making all the ebus related items running in python and we don’t have to deal with a custom Home Assistant syntax. I personally prefer spending time learning python over learning a custom program specific language/syntax.
Python script
script below:
queries the ebus for certain parameters (three temperatures in this example)
broadcasts them as an mqtt message, pay attention the messages generated in the python scripts (e.g. sensor/thermostat/temperature) match with the state_topic defined in the sensors (see next section)
store the script again in /home/homeassistant/.homeassistant/python_scripts/
Add the following mqtt sensors to configuration.yaml. This contains a username and password for the mqtt configuration (stored in secrets.yaml), for initial debugging you could consider removing username and password.
We’ll create a shell_command to be able to call the python script above to read out the parameters on the ebus, we’ll add a third item called read_ebus (readtime_thermostat.py is the script mentioned above).
Now we will use a first automation to trigger a periodic reading of the ebus (if you don’t want to do this in Home Assistant you could do this in python as well). Here we’ll trigger a new reading every 7 minutes.
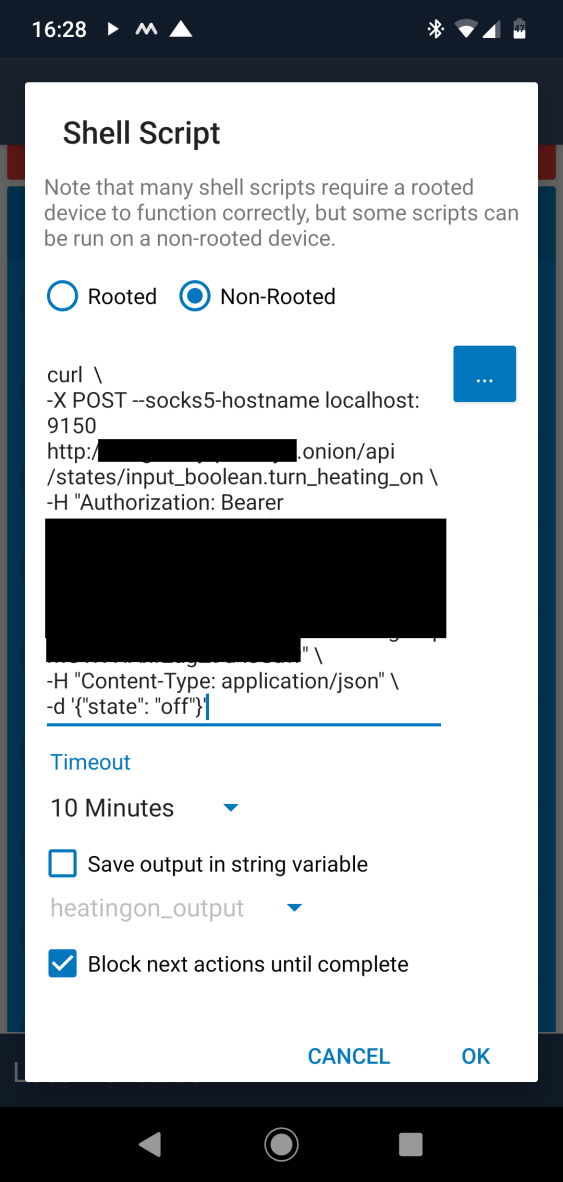
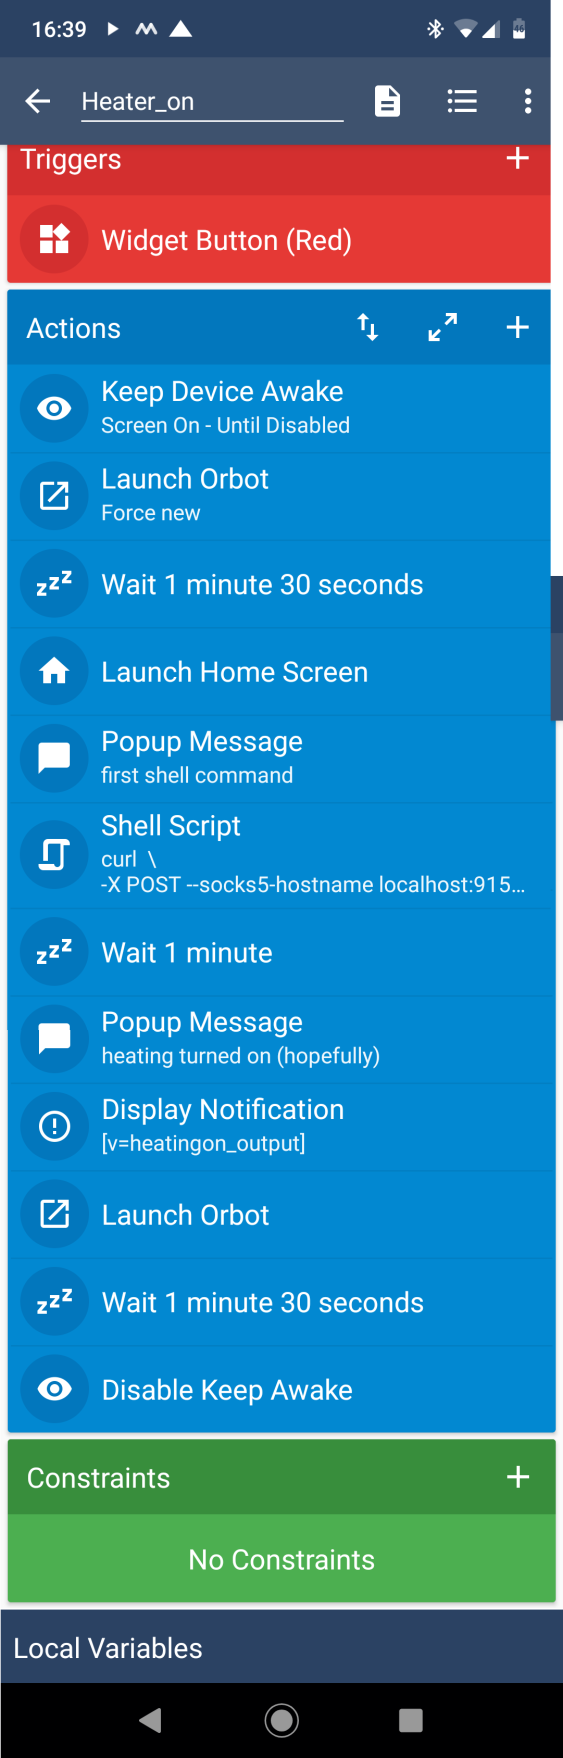
This is the continuation of HomeAssistant Tor. Here we’ll create a macro to automatically turn our heating on/off from an Android phone. The end result is something which only requires two / three pushes on a button on your android phone to turn on my heating.
It works when being connected to a mobile network as well as a wifi network.
Method and tools
Macrodroid: Android app used for creating the macro. It’s free and can do everything we need.
Test your shell script and play with the “state” attribute, you should see the turn_heating_on change accordingly (“off”/“on”)
Incorporate in larger macro
Create a larger macro which starts and stops Orbot automatically.
Since my home automation assumes a change from “off” to “on”, the turn_heating_on will be first put “off” and then put to “on”
Macrodroid macro
The end result is, I need two/three pushes on the screen to turn my heating on:
First push: start the macro
Second push: when the orbot screen launches, push the big onion to connect to the tor network
Optional third push: when the orbot screen launches for the second time, disconnect from the tor network
6 - Additonal electric heater
Intro
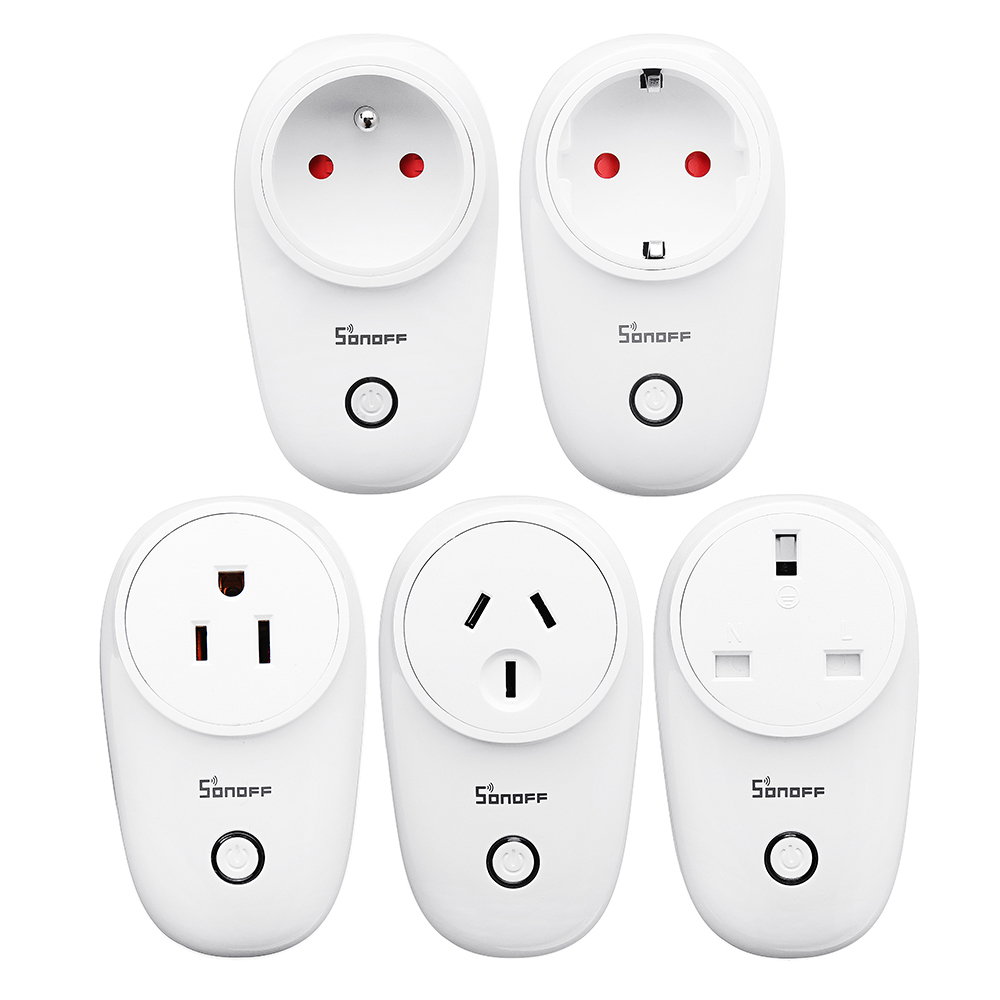
We’ll be using one of the sonoff devices to turn on/off a wall-plugged electric heater. These devices are pretty cheap but since we’ll be hacking into them, use at your own risk.
The sonoff S20 is more hackerfriendly compared to the S26 (from soldering standpoint). But once it’s done, the S26 is more compact and looks slick :). I’ve used both in the meantime (and I’m not a soldering guru by far).
Once this is done, MQTT messages will be used to control and report the status through the interface of Home Assistant
Configure MQTT Tasmota
First, flash the Tasmota software.
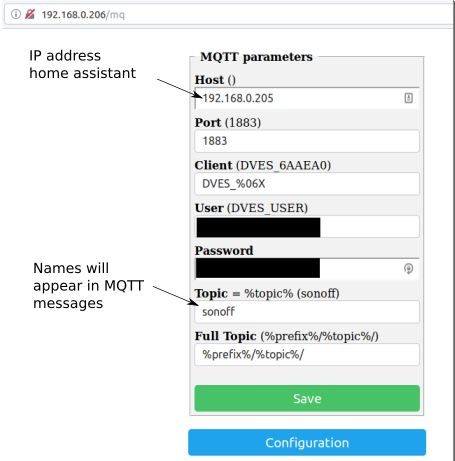
Then browse to the ip-address of your sonoff device and click further to do some limited MQTT configuration. Here you can define the names / passwords / username of your MQTT topics (see screenshot below). The full name of the MQTT can be double checked in http://IP_ADDRESS_OF_YOUR_SONOFF/in.
MQTT configuration in Tasmota
The MQTT methods in the Tasmota software are very well documented (a bit overwhelming at first):
Two MQTT topics will be used for this application:
one to report the status
one to send the commands (this one doesn’t need additional configuration)
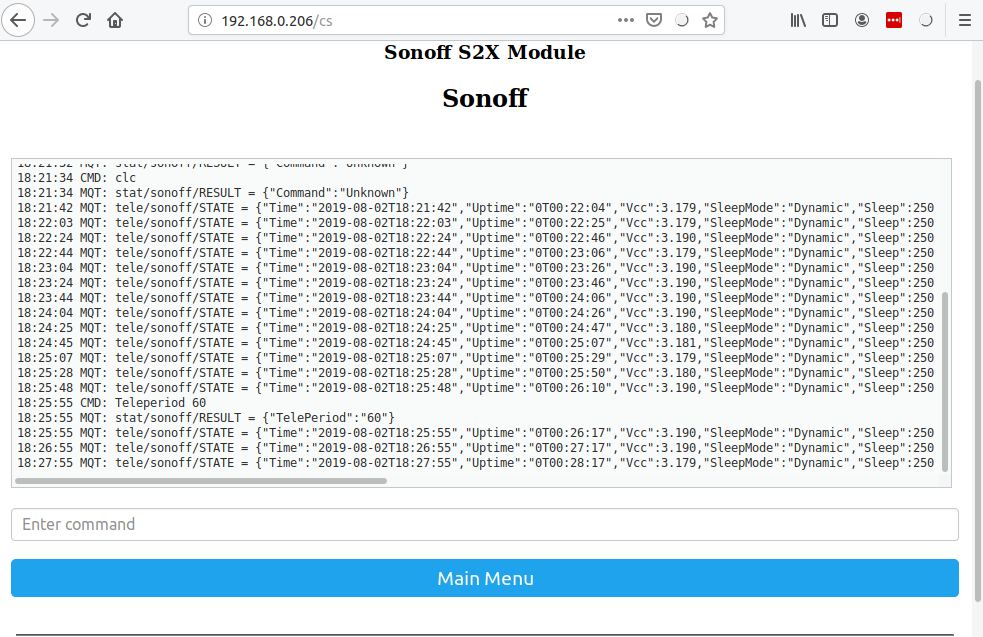
To monitor the status of the device, the tele-messages - continuously broadcasted by Tasmota - will be used. The update rate of the tele-message can be set with the TelePeriod command (see screenshot below).
Configure update rate of the tele-message to 60 seconds
Home assistant
First check if the messages truly arrive on the host, by listening to them from the terminal on the host:
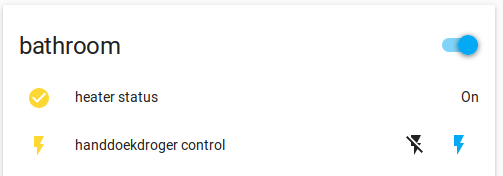
Now, define a binary sensor in configuration.yaml to monitor the on/off status of the device. Here the value_template needs to be used to filter the specific message we want (here on/off of the device).
et voila, one can command and read the status of the sonoff device through Home Assitant:
(of course there is a delay of maximum 60s in the status reporting due to the usage of the tele-message.)
MQTT configuration in Tasmota
7 - Link with house alarm
Intro
I’ve let a relay install during yearly maintenance of my burglar alarm, this allows me to tell me when the alarm is turned on or off. This makes life for presence detection significantly more simple :).
We’ll use MQTT to send status of alarm to Home Assistant.
Troubleshooting
The connection of a Wemos D1 with Arduino IDE seems to be junk (the arduino IDE part). We need to use esptool instead
pip3 install esptool.
